---
title: さくらの高火力VRTで動画生成向けComfyUI環境を作ってみた!
description: GPUを活用した高火力VRTでComfyUI環境を構築する方法をご紹介します。
image: https://corp.aicu.ai/hubfs/rectangle_large_type_2_5b93e6888635e762955886317e1f7b97.webp
---
[](https://aicu.ai)
Search toggle
- [AICU](https://aicu.ai/)
AICU
- [Blog \[English\]](https://corp.aicu.ai/en)
- [Blog \[Japanese\]](https://corp.aicu.ai/ja/)
- [note](https://note.com/aicu)
- [medium](https://medium.com/@aicu)
- [Products](https://corp.aicu.ai/ja/products)
Products
- [AICU media](https://note.com/aicu/)
- [X(Twitter)@AICUai](https://twitter.com/AICUai)
- [日本市場向け製品](https://corp.aicu.ai/ja/products)
日本市場向け製品
- [特定商取引法](https://corp.aicu.ai/jp-commercial-transactions-act)
- [AI market dev solutions](https://corp.aicu.ai/products)
- [LINE Chatbot \[LuC4\] 全力肯定彼氏くん](https://corp.aicu.ai/ja/tag/luc4%E5%85%A8%E5%8A%9B%E8%82%AF%E5%AE%9A%E5%BD%BC%E6%B0%8F%E3%81%8F%E3%82%93)
- [AICuty](https://corp.aicu.ai/aicuty)
- [Lecture](https://bit.ly/AICUCEO)
- [AICU Creator Union Membership](https://note.com/aicu/membership/info)
- [Pricing](https://corp.aicu.ai/ja/pricing)
- [AICU Japan](https://aicu.jp/)
- [About Us](https://corp.aicu.ai/about)
About Us
- [Vision](https://corp.aicu.ai/vision)
- [Privacy Policy](https://corp.aicu.ai/ja/privacy)
- [Media Policy](https://corp.aicu.ai/media-policy)
- [PRTIMES](https://prtimes.jp/main/html/searchrlp/company_id/133647)
- [Become a partner](https://j.aicu.ai/Creg)
- [Contact](https://corp.aicu.ai/contact)
[Follow us on Facebook](https://m.me/118997804638852?ref=klE9gy8WjnrE) [Follow us on Twitter](https://www.youtube.com/@AICuty) [Follow us on Instagram](https://twitter.com/AICUai)
[](https://aicu.ai)
- [AICU](https://aicu.ai/)
AICU
- [Blog \[English\]](https://corp.aicu.ai/en)
- [Blog \[Japanese\]](https://corp.aicu.ai/ja/)
- [note](https://note.com/aicu)
- [medium](https://medium.com/@aicu)
- [Products](https://corp.aicu.ai/ja/products)
Products
- [AICU media](https://note.com/aicu/)
- [X(Twitter)@AICUai](https://twitter.com/AICUai)
- [日本市場向け製品](https://corp.aicu.ai/ja/products)
日本市場向け製品
- [特定商取引法](https://corp.aicu.ai/jp-commercial-transactions-act)
- [AI market dev solutions](https://corp.aicu.ai/products)
- [LINE Chatbot \[LuC4\] 全力肯定彼氏くん](https://corp.aicu.ai/ja/tag/luc4%E5%85%A8%E5%8A%9B%E8%82%AF%E5%AE%9A%E5%BD%BC%E6%B0%8F%E3%81%8F%E3%82%93)
- [AICuty](https://corp.aicu.ai/aicuty)
- [Lecture](https://bit.ly/AICUCEO)
- [AICU Creator Union Membership](https://note.com/aicu/membership/info)
- [Pricing](https://corp.aicu.ai/ja/pricing)
- [AICU Japan](https://aicu.jp/)
- [About Us](https://corp.aicu.ai/about)
About Us
- [Vision](https://corp.aicu.ai/vision)
- [Privacy Policy](https://corp.aicu.ai/ja/privacy)
- [Media Policy](https://corp.aicu.ai/media-policy)
- [PRTIMES](https://prtimes.jp/main/html/searchrlp/company_id/133647)
- [Become a partner](https://j.aicu.ai/Creg)
- [Contact](https://corp.aicu.ai/contact)
Search toggle
[](https://aicu.ai)
- [AICU](https://aicu.ai/)
AICU
- [Blog \[English\]](https://corp.aicu.ai/en)
- [Blog \[Japanese\]](https://corp.aicu.ai/ja/)
- [note](https://note.com/aicu)
- [medium](https://medium.com/@aicu)
- [Products](https://corp.aicu.ai/ja/products)
Products
- [AICU media](https://note.com/aicu/)
- [X(Twitter)@AICUai](https://twitter.com/AICUai)
- [日本市場向け製品](https://corp.aicu.ai/ja/products)
日本市場向け製品
- [特定商取引法](https://corp.aicu.ai/jp-commercial-transactions-act)
- [AI market dev solutions](https://corp.aicu.ai/products)
- [LINE Chatbot \[LuC4\] 全力肯定彼氏くん](https://corp.aicu.ai/ja/tag/luc4%E5%85%A8%E5%8A%9B%E8%82%AF%E5%AE%9A%E5%BD%BC%E6%B0%8F%E3%81%8F%E3%82%93)
- [AICuty](https://corp.aicu.ai/aicuty)
- [Lecture](https://bit.ly/AICUCEO)
- [AICU Creator Union Membership](https://note.com/aicu/membership/info)
- [Pricing](https://corp.aicu.ai/ja/pricing)
- [AICU Japan](https://aicu.jp/)
- [About Us](https://corp.aicu.ai/about)
About Us
- [Vision](https://corp.aicu.ai/vision)
- [Privacy Policy](https://corp.aicu.ai/ja/privacy)
- [Media Policy](https://corp.aicu.ai/media-policy)
- [PRTIMES](https://prtimes.jp/main/html/searchrlp/company_id/133647)
- [Become a partner](https://j.aicu.ai/Creg)
- [Contact](https://corp.aicu.ai/contact)
[Follow us on Facebook](https://m.me/118997804638852?ref=klE9gy8WjnrE) [Follow us on Twitter](https://www.youtube.com/@AICuty) [Follow us on Instagram](https://twitter.com/AICUai)
Search toggle
What are you looking for?
Search
# さくらの高火力VRTで動画生成向けComfyUI環境を作ってみた!
2025/9月/19
 [AICU Japan](https://corp.aicu.ai/ja/author/aidx-lab)

### 画像生成AI・動画生成AIのオープンスタンダード「ComfyUI」が使える環境を さくらインターネットのサーバーで構築してみよう
> さくらインターネットの H100のおかげで
> めちゃ速い ComfyUIができたよ〜[#さくらインターネット](https://twitter.com/hashtag/%E3%81%95%E3%81%8F%E3%82%89%E3%82%A4%E3%83%B3%E3%82%BF%E3%83%BC%E3%83%8D%E3%83%83%E3%83%88?src=hash&ref_src=twsrc%5Etfw) [#高火力VRT](https://twitter.com/hashtag/%E9%AB%98%E7%81%AB%E5%8A%9BVRT?src=hash&ref_src=twsrc%5Etfw) [#H100](https://twitter.com/hashtag/H100?src=hash&ref_src=twsrc%5Etfw) [pic.twitter.com/1LZ3hg28TJ](https://t.co/1LZ3hg28TJ)
>
> — AICU - つくる人をつくる (@AICUai) [September 19, 2025](https://twitter.com/AICUai/status/1969081244991230166?ref_src=twsrc%5Etfw)
さくらインターネットの**高火力VRT**(=GPUを使えるVM)を使って、世界の画像生成・動画生成でのオープンなスタンダードになりつつあるGUIツール「ComfyUI」で動画生成ができる環境を構築してみました。GPUは**さくらの高火力VRT**で利用できるV100、そしてH100。メモリ56GBそしてVRAMが32GBといったサーバー環境で、オープンなAIモデル「Wan2.2」での動画生成を中心に構築してみます。本稿ではSSH接続からドライバ、PyTorch、ComfyUIの導入までの手順をまとめます。ComfyUIのセットアップや操作についてはAICUのほか記事をご参照ください。
https://j.aicu.ai/comfysb
## 検証に使用した環境
### さくらの高火力VRT V100
- CPU: 4コア
- RAM: 56GB
- GPU: NVIDIA Tesla V100 (32GB)
- Disk: 250GB
- OS: Ubuntu 24.04LTS
### さくらの高火力VRT H100
- CPU: 24コア
- RAM: 240 GB
- GPU: NVIDIA H100 SXM 80GB x1
- Disk: 500GB
- OS: Ubuntu 24.04LTS
https://www.sakura.ad.jp/corporate/information/newsreleases/2025/07/31/1968220368/
## 1. 「さくらのクラウド」ホームからの設定
IDを作成したら、プロジェクトを作成します。課金単位は「プロジェクト」ごとになり、GPUインスタンスは各プロジェクトで1件になります。
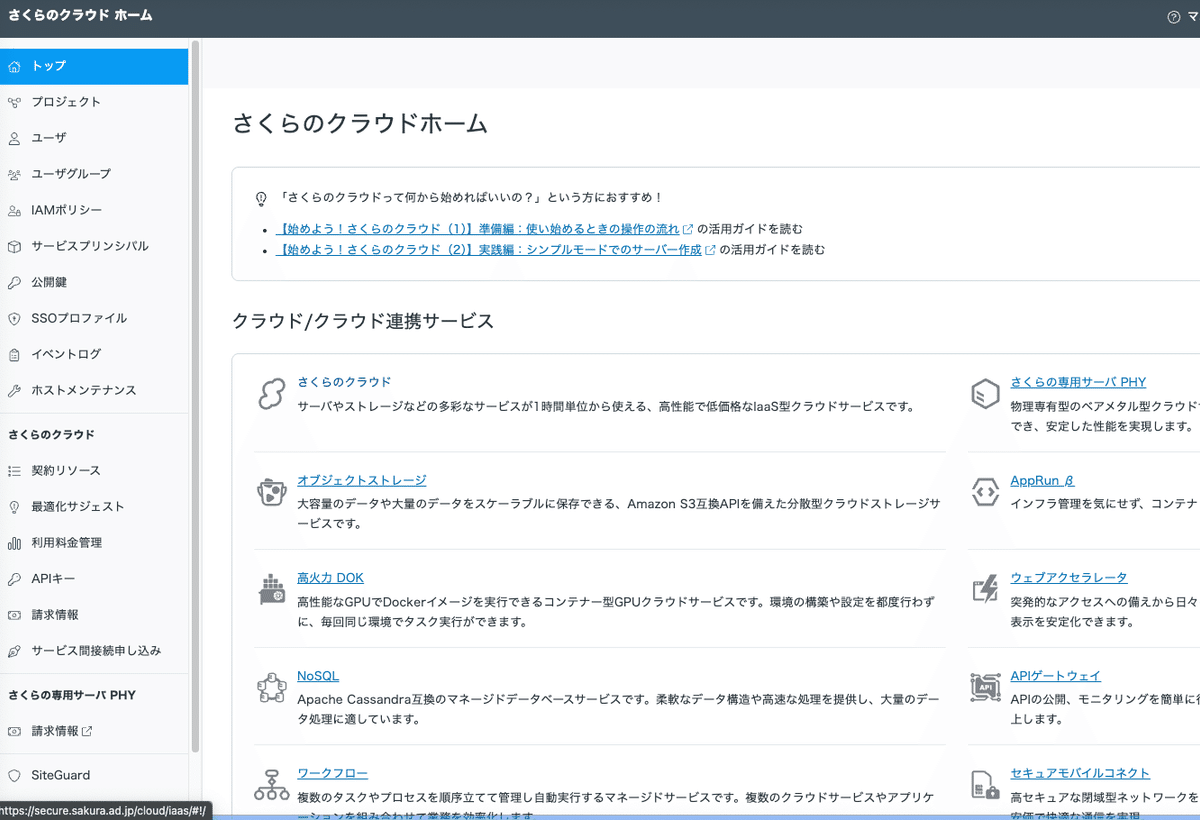
まずは「さくらのクラウド」を選びます。これは意外と忘れやすい。
[](https://assets.st-note.com/img/1758178140-ZA1zPSMQvuNLqh40bFWJXI5g.png?width=2000&height=2000&fit=bounds&quality=85)
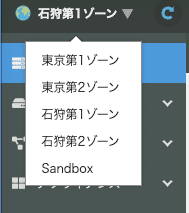
ゾーンは「石狩第1」を選びます。
[](https://assets.st-note.com/img/1758178140-wp5VCaiQY3geuTO7PtXEDbdM.png?width=2000&height=2000&fit=bounds&quality=85)
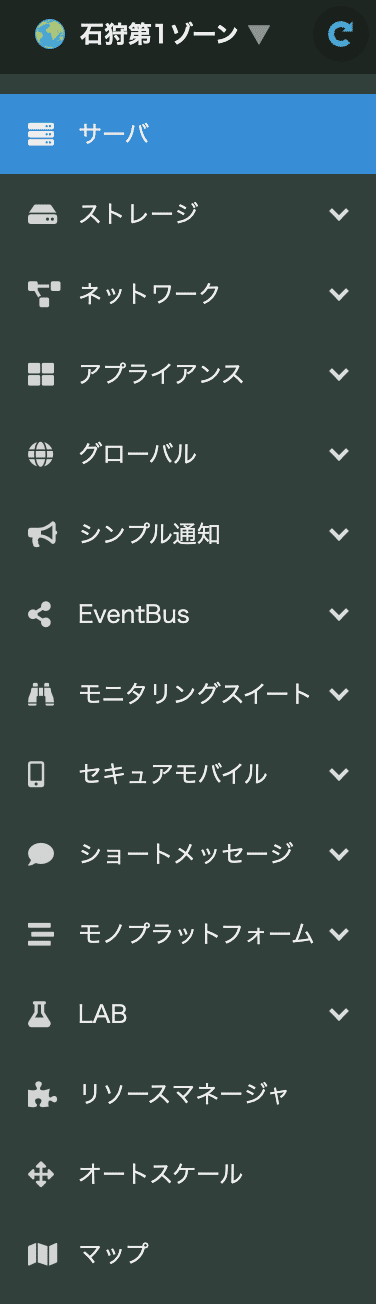
左側メニューはこんな感じなります。
[](https://assets.st-note.com/img/1758293598-ReAYM4ufTGmF6aZjoqtkwPDg.png?width=2000&height=2000&fit=bounds&quality=85)
「サーバー」の右上で「追加」
[](https://assets.st-note.com/img/1758178140-2ouDCBqxQdFliryR7E6fSh1a.png?width=2000&height=2000&fit=bounds&quality=85)
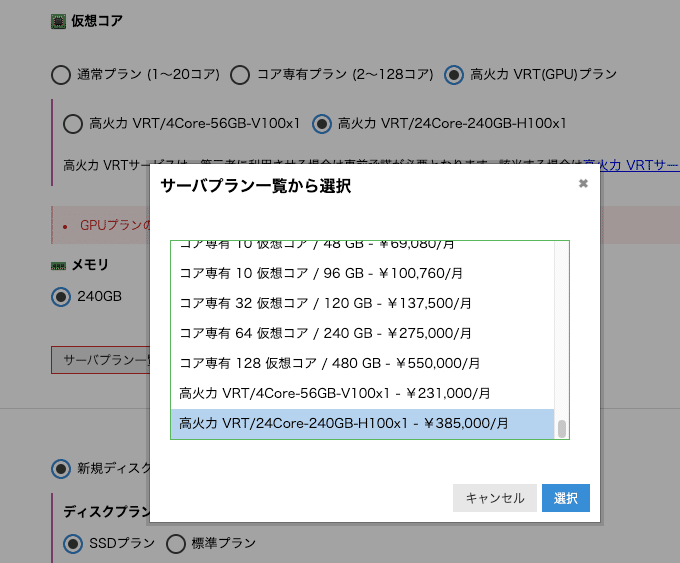
サーバープランが選べます。下の方に行くと、V100かH100のいずれかが選べます。
[](https://assets.st-note.com/img/1758178140-rl2am9ZXn4LwyzSA1uONRUTi.png?width=2000&height=2000&fit=bounds&quality=85)
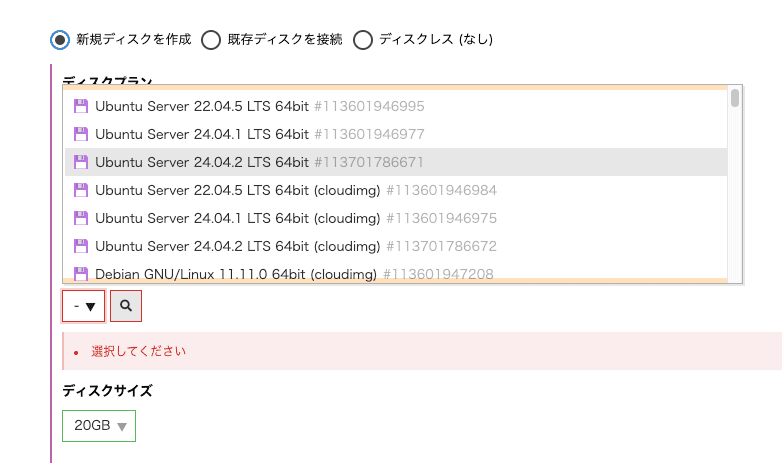
Ubuntu Server 24.04.2 LTSを選びます。
[](https://assets.st-note.com/img/1758178140-qOE25MTN0uC6a384HcVRtyAB.png?width=2000&height=2000&fit=bounds&quality=85)
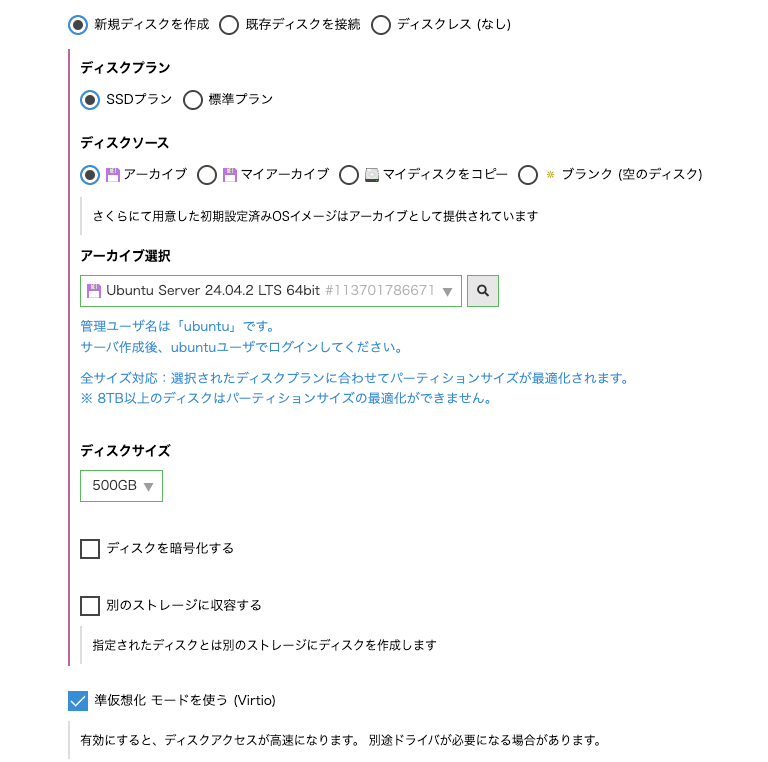
ディスクサイズは静止画なら200GB以上、動画生成なら500GB以上は確保したいところですが、ご予算次第です。
[](https://assets.st-note.com/img/1758178140-62pUezHk90wfJsjaK4qWxG1Y.png?width=2000&height=2000&fit=bounds&quality=85)
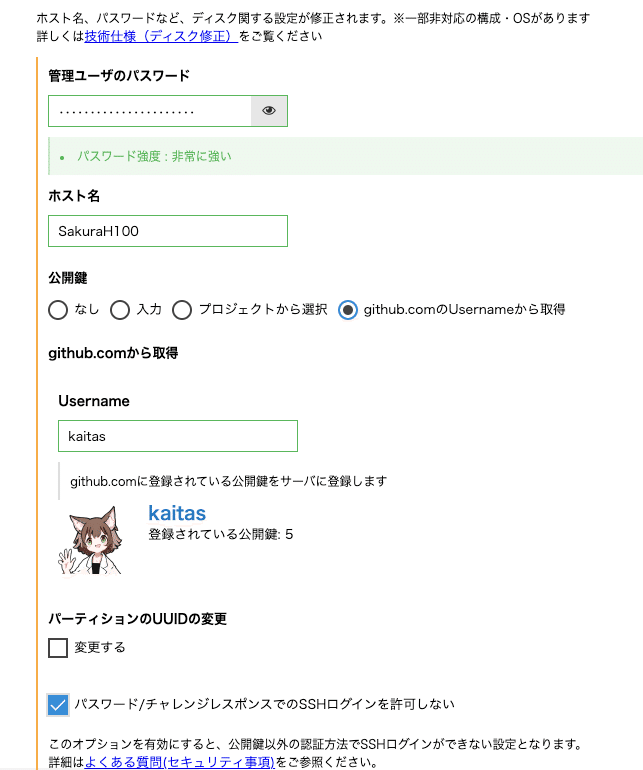
続いて管理ユーザーのパスワードです。パスワードはSSHでログインしつつもsudoで使用しますので、高難度にしすぎると後で大変です。ここではenpassを使って生成しました。
https://www.enpass.io/
公開鍵をGitHubから取得します。管理者のユーザー名を使って取得できます。
[](https://assets.st-note.com/img/1758178140-rtsncdpW7MZXRgUHY1PaqVjT.png?width=2000&height=2000&fit=bounds&quality=85)
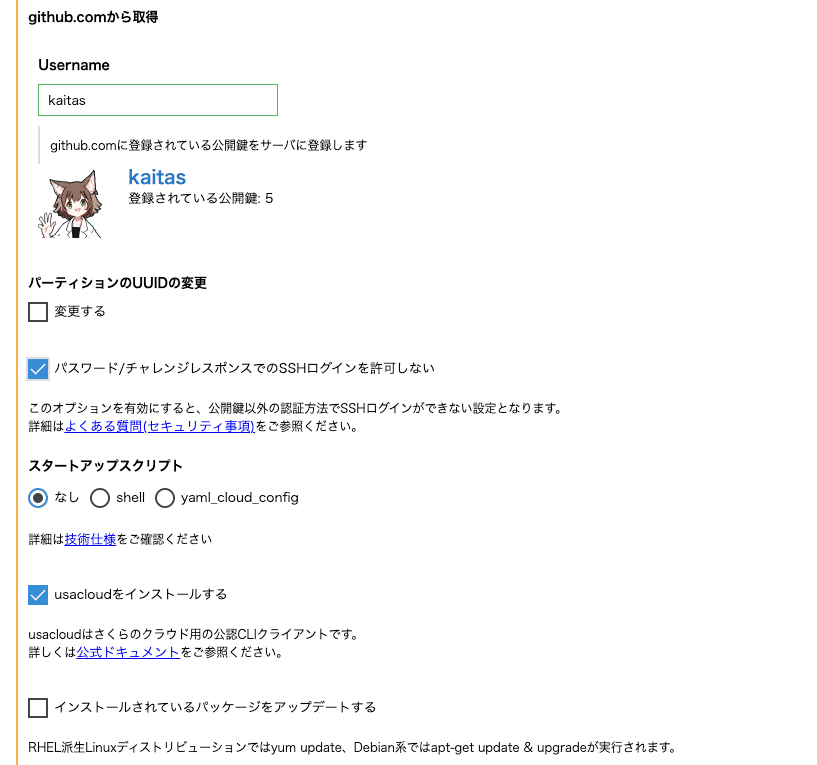
「パスワード/チャレンジレスポンスでのSSHログインを許可しない」は自信がない時はOFF、つまり「許可する」にしておいてもいいです。これを失敗すると、SSHで入れなくなると、サーバーを作り直すことになります。
[](https://assets.st-note.com/img/1758178140-RmYoQrnhX1WGAyqIPvsltMVF.png?width=2000&height=2000&fit=bounds&quality=85)
usacloudについては別の機会に紹介します。
さくらインターネットをコマンドライン(CLI)で利用するツールです。
[https://docs.usacloud.jp/usacloud/](https://docs.usacloud.jp/usacloud/)
サーバー名、タグについては簡単で。
[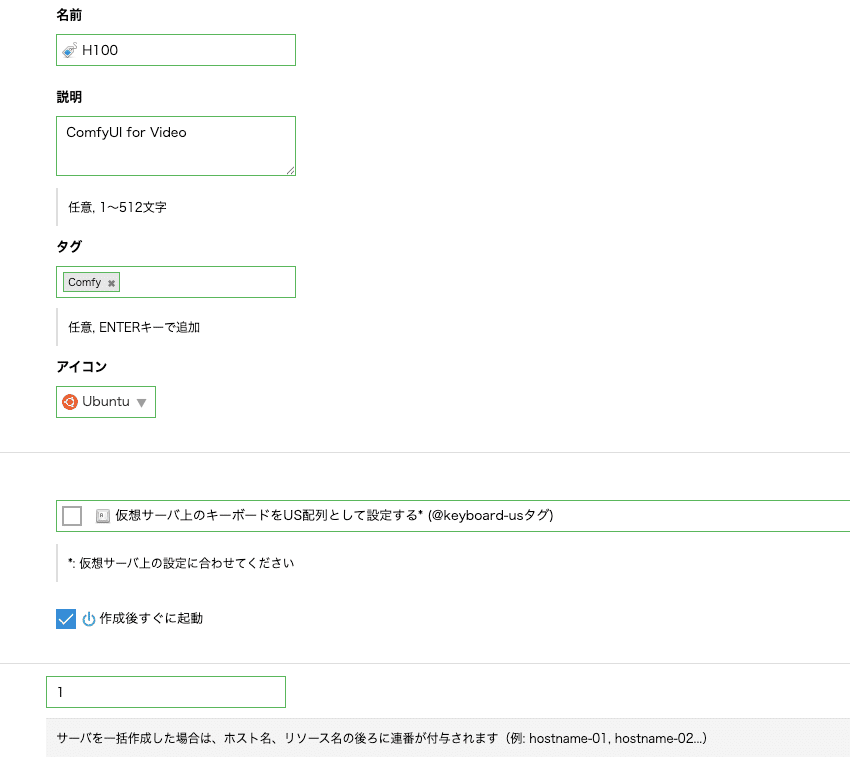](https://assets.st-note.com/img/1758178140-rJ5oak3wMFAORy4jIWHidQ6G.png?width=2000&height=2000&fit=bounds&quality=85)
キーボードはUSキーボードを使っている場合はチェックONしておきましょう。
いざここで作成!なのですが、
「GPUプランの上限を超えました」というエラーが出ることがあります。
[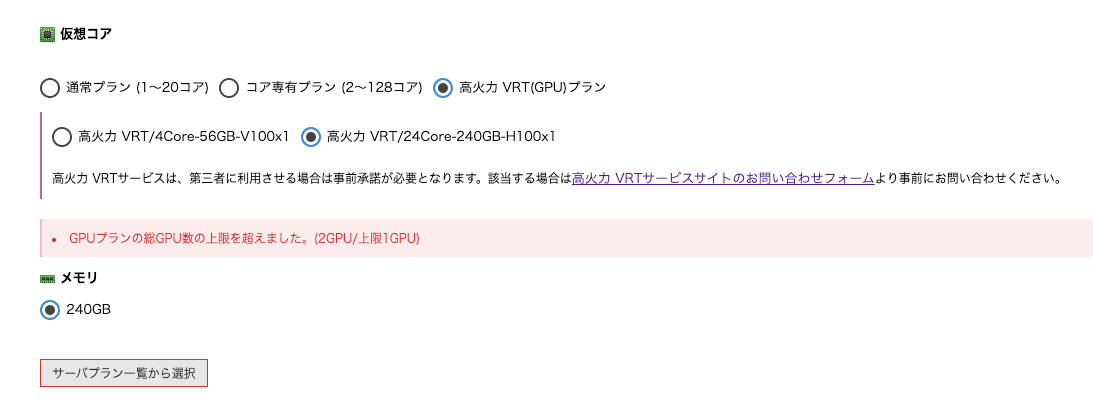](https://assets.st-note.com/img/1758178140-Ds0a7ZNRJk4LdIpcXnvTCF6B.png?width=2000&height=2000&fit=bounds&quality=85)
[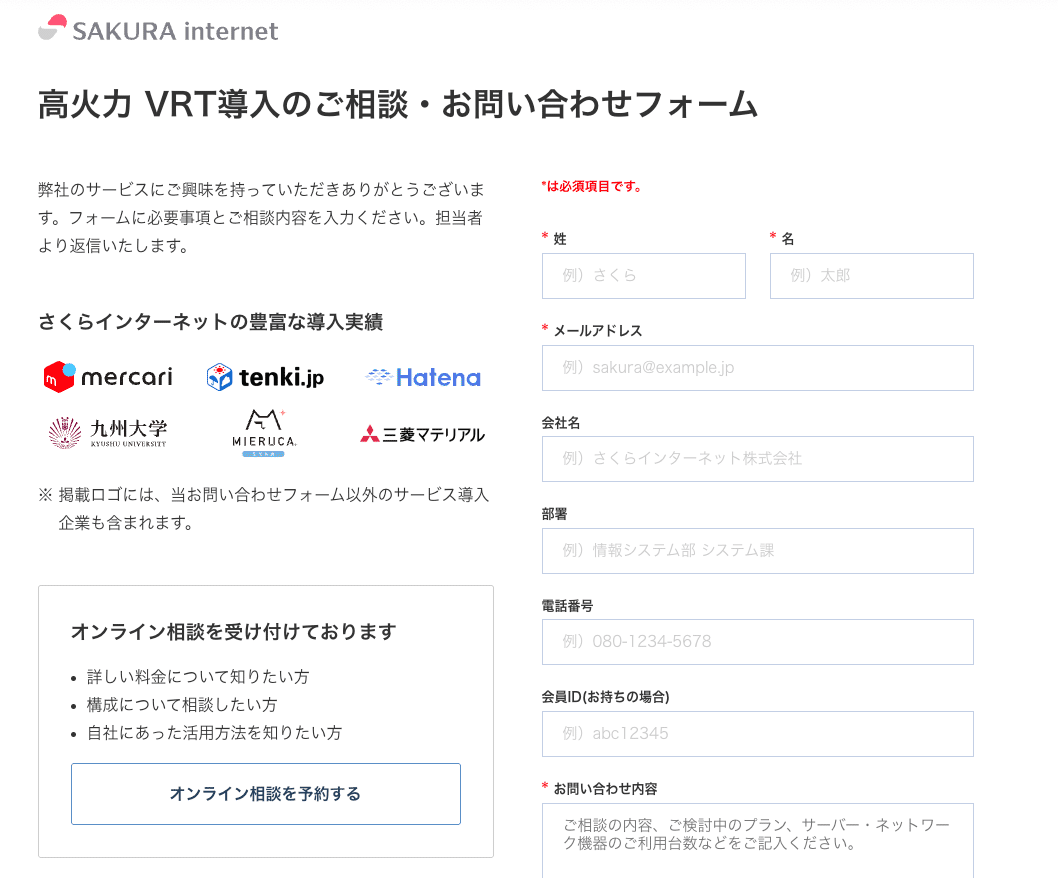](https://assets.st-note.com/img/1758178140-DMTFbruNozstqplQk4EeaB7X.png?width=2000&height=2000&fit=bounds&quality=85)
リソース上限変更依頼が必要です。前もってメールを送りましょう。
```
宛先 support@sakura.ad.jp件名 さくらのクラウド リソース上限変更依頼本文・会員ID: ・会員名(法人・契約者名): ・プロジェクト名: 会員IDに続いて ・利用ゾーン:石狩第1 ・項目:GPU ※ディスク数上限の引き上げをご希望の場合は、標準プラン/SSDプラン/大容量プラン(2TB以上のディスク) それぞれのご利用見込み容量もご記入ください。 例: 標準プラン 10TB, SSDプラン 5TB, 大容量プラン 0 ・変更後の値:(100・200などご希望の上限値) ・利用用途:(背景/用途) ・消費ペース:(○ヶ月で△くらい使用する見込み)※6ヶ月以内での消費ペースをご記入ください
```
[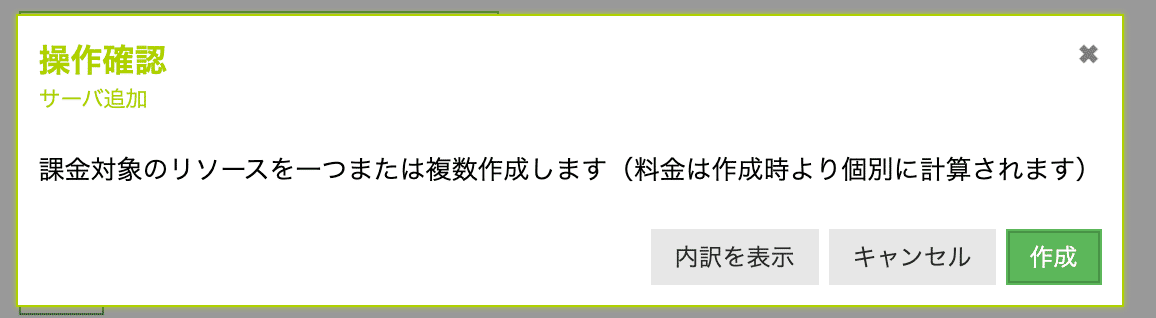](https://assets.st-note.com/img/1758296101-PKBWZudO6kgGQcTYLjXi4hsD.png?width=2000&height=2000&fit=bounds&quality=85)
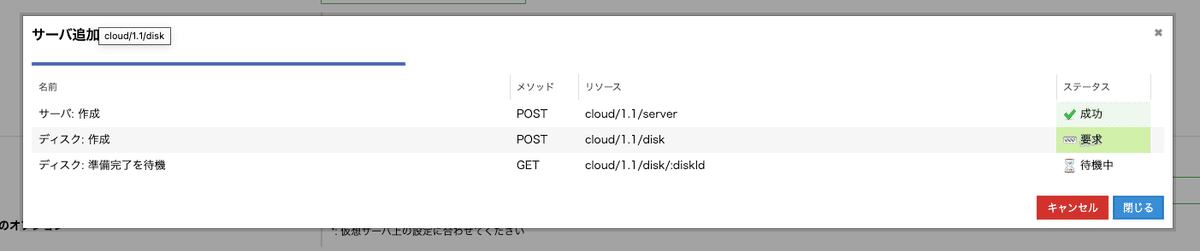
無事にサーバー構築が始まるとこんな感じになります。
[](https://assets.st-note.com/img/1758178140-Oenr4btg7oALqBvZTHpuCYJh.png?width=2000&height=2000&fit=bounds&quality=85)
できあがったらお手持ちのSSHからログインしてみます。
### サーバーにログイン
ssh ubuntu@IPアドレスです。設定が終わっていれば、ED25519 key fingerprintが表示され、
**Are you sure you wan to continue connecting (yes/no/\[fingerprint\])?**と表示されます。
これでEnterキーを押すと「fingerprint」で入ろうとしますが、GitHubに鍵が登録されている場合、つまり鍵を作成されている人は \[yes\]で入ります。
公開鍵をGitHubに登録していない人は登録しましょう。
以下のコマンドを叩き公開鍵の中身を表示して全文コピーします。
cat ~/.ssh/id\_rsa.pub
GitHubの「Settings \> SSH and GPG keys」で追加します。
「New SSH key」と進み、先ほどコピーした公開鍵を登録します。
Titleはわかりやすい名前であればなんでも大丈夫です。
.sshディレクトリのパーミッションを変更しておきます。
chmod 700 ~/.ssh/
chmod 600 ~/.ssh/id\_rsa
「入力」公開鍵を選んで、現在使っているshellの「.ssh/id\_rsa.pub」の中身を貼り付けます。
詳しくはさくらインターネットの公式サポート情報をどうぞ!
[https://help.sakura.ad.jp/rs/2247/](https://help.sakura.ad.jp/rs/2247/)
[https://docs.github.com/ja/authentication/connecting-to-github-with-ssh/adding-a-new-ssh-key-to-your-github-account](https://docs.github.com/ja/authentication/connecting-to-github-with-ssh/adding-a-new-ssh-key-to-your-github-account)
https://docs.github.com/ja/authentication/connecting-to-github-with-ssh/testing-your-ssh-connection
### ~/.ssh/config を作成して簡略化ログイン
SSHを使ってログインできる環境ができると、ログインも簡単になります。
~/.ssh/config というファイルにこんなふうに書いてあげてください。
```
Host github.com HostName github.com IdentityFile ~/.ssh/id_rsa User git
```
さらにAICU AIDX Labの場合は、2台管理しているさくらインターネットのGPUサーバーを以下のように登録していきます。
> \# ~/.ssh/config
> Host v100
> HostName XXX.XXX.XXX.XXX
> User ubuntu
> IdentifyFile ~/.ssh/id\_rsa
>
> Host h100
> HostName XXX.XXX.XXX.XXX
> User ubuntu
> IdentifyFile ~/.ssh/id\_rsa
これで **ssh h100** とすればログインできるようになります。パスワードは不要です!
## 2. NVIDIAドライバ導入
次にGPUドライバのインストールを行っていきます。
その前に、sudoでのパスワードを打つのが大変なので、
sudo vi /etc/sudoers.d/ubuntu
に
**ubuntu ALL=NOPASSWD: ALL**
と書くと、ユーザー「ubuntu」がパスワードなしでsudoできるようになります。
### まずはドライバー選択
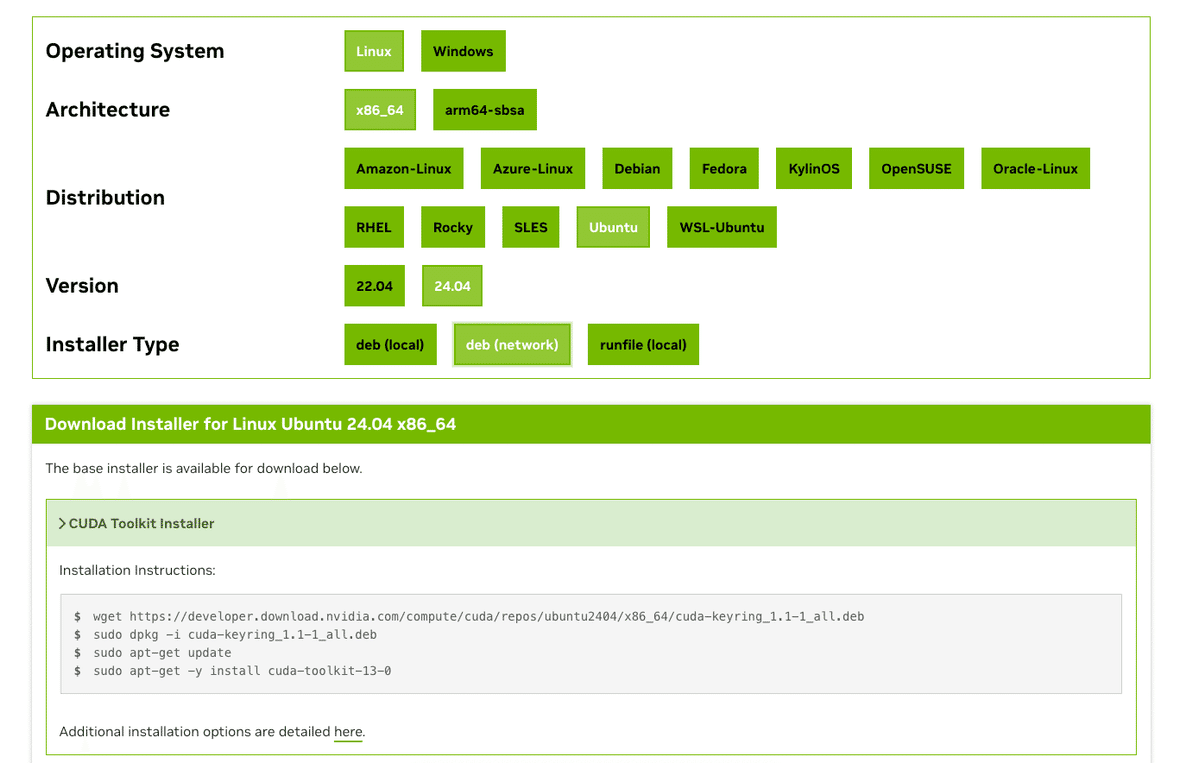
[https://developer.nvidia.com](https://developer.nvidia.com/) に行ってLinux, x86\_64, Ubuntu, 24\_04, debを選びましょう。
https://developer.nvidia.com/cuda-downloads?target\_os=Linux&target\_arch=x86\_64
[](https://assets.st-note.com/img/1758294917-bOuQhyXcdePwKT3f9ZmDLrGq.png?width=2000&height=2000&fit=bounds&quality=85)
下の方に「CUDA Toolkit Installer」の手順が表示されますので従っていきます。
[https://developer.nvidia.com/cuda-downloads?target\_os=Linux&target\_arch=x86\_64&Distribution=Ubuntu&target\_version=24.04&target\_type=deb\_network](https://developer.nvidia.com/cuda-downloads?target_os=Linux&target_arch=x86_64&Distribution=Ubuntu&target_version=24.04&target_type=deb_network)
ダウンロードして、管理者権限で、キーリングをインストールして、apt-getで cuda-toolkit-13.0をインストールしています。
```
wget https://developer.download.nvidia.com/compute/cuda/repos/ubuntu2404/x86_64/cuda-keyring_1.1-1_all.debsudo dpkg -i cuda-keyring_1.1-1_all.debsudo apt-get updatesudo apt-get -y install cuda-toolkit-13-0
```
続いてドライバー本体をインストールします。
実はここに2つの選択肢があります。
**sudo apt-get install -y nvidia-open
sudo apt-get install -y cuda-drivers**
上がオープンソース版のドライバー、下が旧来のプロプライエタリー版、つまりNVIDIAが製品として管理してきたバージョンがあります。いろいろなトラブルも多いのですが、せっかくLinux版ですのでここはオープン版を選びます。
Ubuntu 22.04 の場合はこんな感じです。いろいろやってみたのですが、古いUbuntuにはそれなりに手間もあるので、今であればUbuntu 24.04LTSを使うでいいかなと思いました。
```
sudo apt update && sudo apt install -y gcc gnupgsudo dpkg -i nvidia-driver-local-repo-ubuntu2204-515.48.07_1.0-1_amd64.debsudo cp /var/nvidia-driver-local-repo-*/nvidia-driver-local-*-keyring.gpg /usr/share/keyrings/wget https://developer.download.nvidia.com/compute/cuda/repos/ubuntu2204/x86_64/cuda-keyring_1.0-1_all.debsudo dpkg -i cuda-keyring_1.0-1_all.debsudo apt updatesudo apt install -y nvidia-driver-515sudo reboot
```
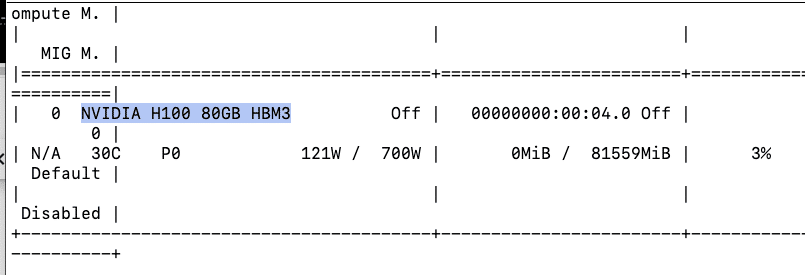
ドライバーの確認です。
```
nvidia-smi
```
[](https://assets.st-note.com/img/1758295255-TDtJwvLVfpkSQ9XHGqEm3zna.png?width=2000&height=2000&fit=bounds&quality=85)
やったぜ!H100, VRAM 80GBです。HBM3とは High Bandwidth Memory 3、メモリチップを縦方向に積層する3D設計を採用した次世代メモリ規格で、特にAI、ハイパフォーマンスコンピューティング(HPC)、データセンター向けに設計されています。従来のDRAM技術と比較して帯域幅と容量が大幅に向上しており、1ピンあたりの速度、総帯域幅、消費電力効率を向上させています。
## 3. Python環境とPyTorch
仮想環境を作成し、PyTorchをGPU対応でインストールしていきます。
```
sudo apt install -y python3-venv python3-fullpython3 -m venv ~/venv-comfyuisource ~/venv-comfyui/bin/activatepip install --upgrade pippip install "numpy<2.0.0"pip install torch==2.2.2+cu118 torchvision==0.17.2+cu118 torchaudio==2.2.2 \ --extra-index-url https://download.pytorch.org/whl/cu118
```
動作確認として、torchのコードで確認です。torch\_test.py を作ってみます。
```
import torchprint(torch.__version__, torch.version.cuda)print(torch.cuda.is_available())print(torch.cuda.get_device_name(0))
```
[](https://assets.st-note.com/img/1758295437-PpWKeRqzmIUEDyuZiAc6SbF9.png?width=2000&height=2000&fit=bounds&quality=85)
python3で NVIDIA H100 80GB HBM3が使えることが確認できました!
---
## 4. ComfyUI導入
さていよいよComfyUIを導入していきます。ComfyUIのインストールはソースから入れます。
```
git clone https://github.com/comfyanonymous/ComfyUI.gitcd ComfyUIpip install -r requirements.txt
```
モデルは動作確認なので SD1.5とVAEのみインストールします。
```
mkdir -p models/checkpoints models/vaewget -c https://huggingface.co/runwayml/stable-diffusion-v1-5/resolve/main/v1-5-pruned-emaonly.ckpt -P ./models/checkpoints/wget -c https://huggingface.co/stabilityai/sd-vae-ft-mse-original/resolve/main/vae-ft-mse-840000-ema-pruned.safetensors -P ./models/vae/
```
---
## 5. 動作確認
ここから先は、インターネットへの公開になります。非常に注意が必要なので知識や責任、予算がない方が迂闊に公開することは後悔することになるのでお勧め致しません。本来は認証、ファイヤーウォールの設定などを行うべきですが、ここは動作試験のみを行います。もし設定を間違えた場合の費用規模感としてはこんな感じでかかりますので覚悟しましょう。
[](https://assets.st-note.com/img/1758296535-agezQCBNk5wlVD1ZJpiHbvAO.png?width=2000&height=2000&fit=bounds&quality=85)
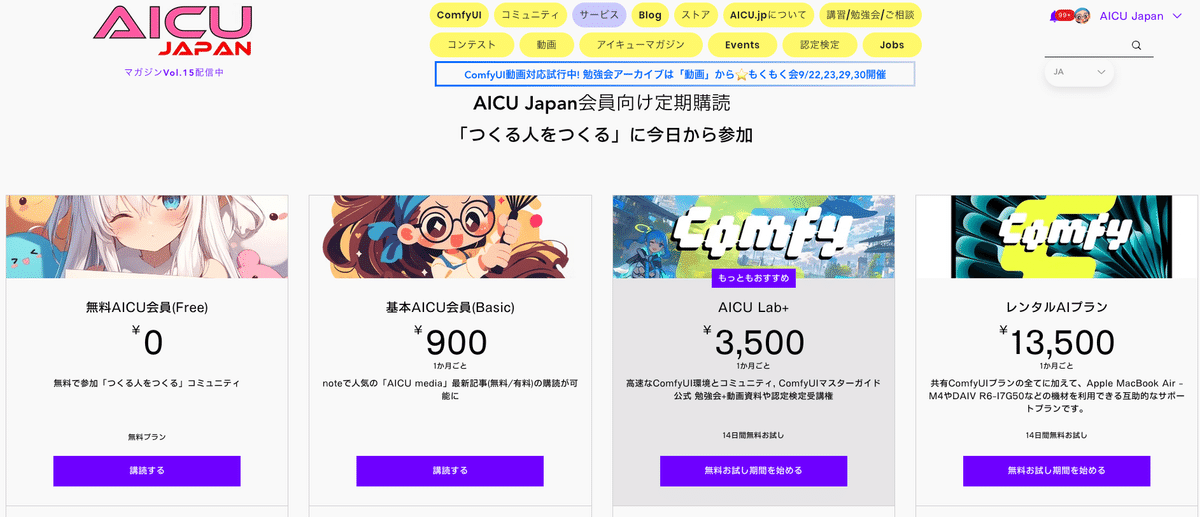
ネットワークの設定は不安…ちょっと遊んでみたいな、という人はぜひ、AICUのサービス「[AICU Lab+](https://www.aicu.jp/pricing-plans/list)」でお試しください(宣伝)。
[](https://assets.st-note.com/img/1758296672-JW6Zu0ogjlvSGyDTM1AhKUc5.png?width=2000&height=2000&fit=bounds&quality=85)
業務的なサーバー構築の案件も歓迎です。
### UFW(Uncomplicated Firewall)の設定
ufwはUbuntu標準の簡易ファイアウォールです。内部ではiptables/nftablesを使いますが、コマンドがシンプルなので動作確認に向いています。
sudo ufw allow 22/tcp
sudo ufw allow 8188/tcp
sudo ufw enable
既存プロセス停止
pkill -f "python3 main.py" || true
0.0.0.0 で起動(外部から受ける)
```
source ~/venv-comfyui/bin/activatecd ~/ComfyUInohup python3 main.py --listen 0.0.0.0 --port 8188 --multi-user --dont-print-server \ > ~/comfyui.log 2>&1 &
```
サーバ内から疎通確認
curl -sI [http://127.0.0.1:8188](http://127.0.0.1:8188/) | head -n1 # 200 OK想定
curl -sI [http://133.242.17.83:8188](http://133.242.17.83:8188/) | head -n1 # これも 200 OK なら外部公開OK
sudo ufw status verbose
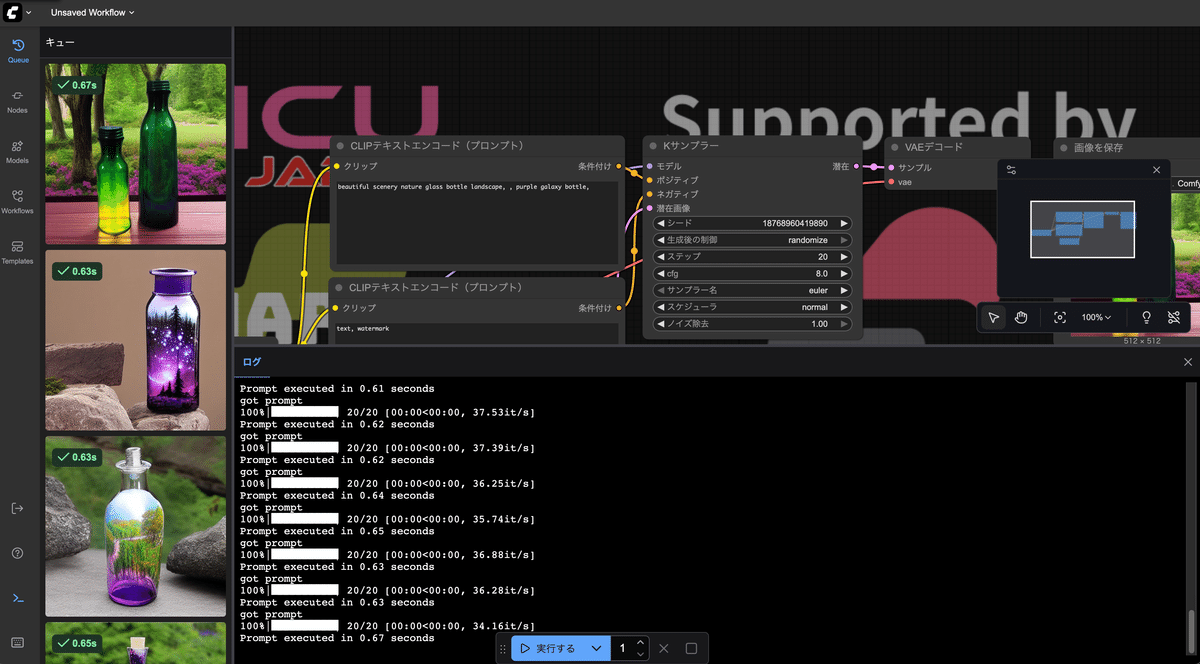
これで http://(IP address):8188 に入れるはずです。
秒速 37イテレーション、プロンプトあたりの実行速度が 0.63秒という速度です。これは速い!!
[](https://assets.st-note.com/img/1758302608-9NMPhmQY7zdXLw3KCe2TuJFV.png?width=2000&height=2000&fit=bounds&quality=85)
### TryCloudflareでの実験
次にGoogle Colabと同様にCloudFlareのVPNを使って動作測定をしてみました。
> \# 1) ComfyUI をローカル束縛で起動(マルチユーザーONの例)
> source ~/venv-comfyui/bin/activate
> cd ~/ComfyUI
> nohup python3 main.py --listen 127.0.0.1 --port 8188 --multi-user --dont-print-server \\
> \> ~/comfyui.log 2\>&1 &
>
> \# 2) ローカルで本当に立ってるか確認(ここがOKならトンネルに乗る)
> until nc -z 127.0.0.1 8188; do sleep 0.5; done
> curl -sI http://127.0.0.1:8188 | head -n1 # HTTP/1.1 200 OK 等が返る想定
>
> \# 3) 一時URLで外部公開(trycloudflare)
> cloudflared tunnel --url http://127.0.0.1:8188
> \# → 出力に \*.trycloudflare.com のURLが出る
こちらも秒速 37イテレーション、プロンプトあたりの実行速度が 0.63秒!
[https://x.com/AICUai/status/1969081244991230166](https://x.com/AICUai/status/1969081244991230166)
> さくらインターネットの H100のおかげで
> めちゃ速い ComfyUIができたよ〜[#さくらインターネット](https://twitter.com/hashtag/%E3%81%95%E3%81%8F%E3%82%89%E3%82%A4%E3%83%B3%E3%82%BF%E3%83%BC%E3%83%8D%E3%83%83%E3%83%88?src=hash&ref_src=twsrc%5Etfw) [#高火力VRT](https://twitter.com/hashtag/%E9%AB%98%E7%81%AB%E5%8A%9BVRT?src=hash&ref_src=twsrc%5Etfw) [#H100](https://twitter.com/hashtag/H100?src=hash&ref_src=twsrc%5Etfw) [pic.twitter.com/1LZ3hg28TJ](https://t.co/1LZ3hg28TJ)
>
> — AICU - つくる人をつくる (@AICUai) [September 19, 2025](https://twitter.com/AICUai/status/1969081244991230166?ref_src=twsrc%5Etfw)
特にVPNを設定しても速度低下につながるというわけではなさそうなので、直接IPアドレスを公開する形のアクセスはやめた方がいいでしょう。
**おつかれさまでした!**この手順で、GPUサーバーが爆速の**ComfyUIクラウドサービス**になります。
## まとめ
- さくらの高火力VRTなら、GPU (V100/H100) を使ってComfyUIを高速動作させられる
この手順で、安定したComfyUI環境を簡単に再現できます。
今回の記事では動作確認に留めましたが、実際には映画産業向けのComfyUIサーバーとして、Slack通知、systemd常駐化、VPN化、認証や運用向けを行っています。
本記事は さくらインターネットのご協力でお送りしています!
http://j.aicu.ai/\_sakura
## おしらせ
現在、2026年度のAICU mediaパートナープログラムを募集しています。
—
この記事の続きはこちらから https://note.com/aicu/n/n2e1ee0c65fab
Originally published at [note.com/aicu](https://note.com/aicu/n/n2e1ee0c65fab) on Sep 19, 2025.
### Share:
[Share on Facebook](http://www.facebook.com/share.php?u=https://corp.aicu.ai/ja/sakura-20250919&utm_medium=social&utm_source=facebook) [Share on LinkedIn](http://www.linkedin.com/shareArticle?mini=true&url=https://corp.aicu.ai/ja/sakura-20250919&utm_medium=social&utm_source=linkedin) [Share on X](https://twitter.com/intent/tweet?original_referer=https://corp.aicu.ai/ja/sakura-20250919&utm_medium=social&utm_source=twitter&url=https://corp.aicu.ai/ja/sakura-20250919&utm_medium=social&utm_source=twitter&source=tweetbutton&text=さくらの高火力VRTで動画生成向けComfyUI環境を作ってみた!)
[AICU](https://corp.aicu.ai/ja/tag/aicu), [ComfyUI](https://corp.aicu.ai/ja/tag/comfyui), [さくらインターネット](https://corp.aicu.ai/ja/tag/さくらインターネット), [H100](https://corp.aicu.ai/ja/tag/h100), [V100](https://corp.aicu.ai/ja/tag/v100), [高火力VRT](https://corp.aicu.ai/ja/tag/高火力vrt)
## AICU Japan
AICU Inc. AIDX Lab - Koto
[info@aicu.ai](mailto:info@aicu.ai)
## Comments
## Related posts
Search [ComfyUI 公式配信:WAN 2.2 VACE 徹底解説(2025/09/16)](https://corp.aicu.ai/ja/comfyui-20250918?hsLang=ja)
[Wan 2.2 Animateのワークフローはどこ? (2025-9-19)](https://corp.aicu.ai/ja/wan-20250920?hsLang=ja) Search

AICU Inc. is AIDX company.
[Follow us on Facebook](https://m.me/118997804638852?ref=klE9gy8WjnrE) [Follow us on Twitter](https://twitter.com/AICUai) [Follow us on Instagram](https://www.youtube.com/@AICuty)
Main Office: 830 STWART DR STE277 SUNNYVALE, CA 94085-4513
```json
{
"@context" : "https://schema.org",
"@type" : "BlogPosting",
"author" : {
"@type" : "Person",
"name" : "AICU Japan",
"url" : "https://corp.aicu.ai/ja/author/aidx-lab"
},
"dateModified" : "2025-09-22T01:49:52.675Z",
"datePublished" : "2025-09-19T23:44:35.000Z",
"headline" : "さくらの高火力VRTで動画生成向けComfyUI環境を作ってみた!",
"image" : [ "https://corp.aicu.ai/hubfs/rectangle_large_type_2_5b93e6888635e762955886317e1f7b97.webp" ],
"mainEntityOfPage" : {
"@id" : "https://corp.aicu.ai/ja/sakura-20250919",
"@type" : "WebPage"
},
"publisher" : {
"@type" : "Organization",
"logo" : {
"@type" : "ImageObject",
"url" : "https://corp.aicu.ai/hubfs/android-chrome-512x512.png"
},
"name" : "AICU Inc."
}
}
```